Table of Contents
Are you ready to sell your old iPad or do you just want to start over? A factory reset is the best way to remove all your data and return your device to its original settings. This important step protects your privacy and prepares the iPad for its next user or a fresh start for you.
This guide will show you how to easily reset your iPad, from backing up your data to completing the reset. Whether you’re fixing problems or getting your iPad ready for someone else, this simple, step-by-step process will make it quick and easy. Let’s get started and reset your iPad!
How to Factory Reset Your iPad Using Settings
To factory reset an iPad using Settings, follow these clear steps:
- Open the Settings App: Locate the “Settings” icon on the home screen and tap it to open the application.
- Go to General: Scroll through the list and select “General” to access a variety of system settings.
Select Reset:
- Scroll to the bottom of the “General” settings menu.
- Tap on “Reset,” which will display several reset options.
Choose Erase All Content and Settings:
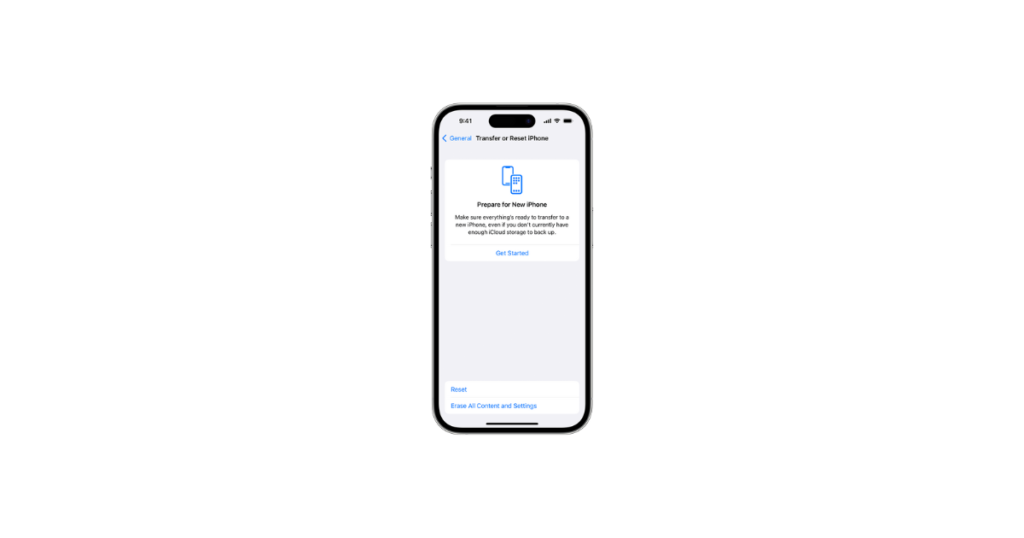
- In the “Reset” menu, select “Erase All Content and Settings.”
- This option will wipe all personal data, apps, and settings from the device.
- Enter Passcode: If a passcode is set for the device, enter it when prompted to proceed with the reset process.
Confirm Your Choice:
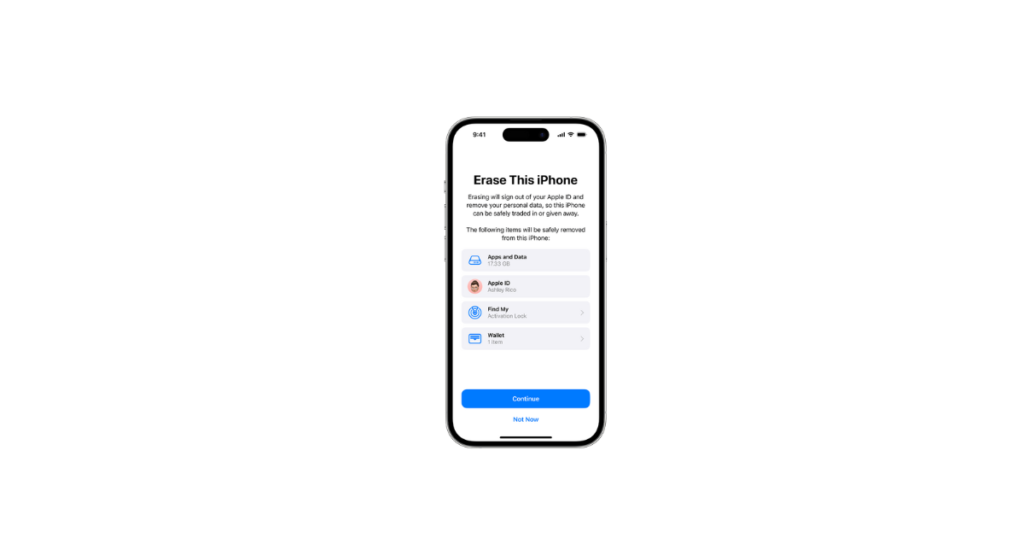
- A warning message will appear asking for confirmation.
- Tap “Erase” again to confirm that you wish to erase all data and return the iPad to its original factory settings.
Enter Apple ID Password:
- If “Find My iPad” is enabled, the user will be prompted to enter their Apple ID password to turn off this feature and continue with the reset.
Wait for the Process to Complete:
- The iPad will begin the reset process, which may take several minutes.
- The Apple logo and a progress bar will appear on the screen during the reset.
Initial Setup Screen:
- Once the reset is complete, the iPad will restart and display the initial setup screen, just like when it was first purchased.
By following these steps, the iPad will be restored to its original factory settings, ready for a fresh start or a new user.
How to Factory Reset Your iPad Using iTunes or Finder
To perform a factory reset on an iPad using iTunes or Finder, follow these easy steps:
Preparation
- Backup Data: Ensure all important data is backed up. Use iCloud or iTunes to back up the device.
- Update Software: Update iTunes to the latest version. Use Finder on macOS Catalina 10.15 and later.
Steps for Windows or macOS Mojave and Earlier
- Launch iTunes: Open iTunes on your computer.
- Connect the iPad: Use a USB cable to connect the iPad to the computer.
- Trust Computer: If prompted, tap “Trust This Computer” on the iPad.
- Select Device: Click the iPad icon in the upper left corner of iTunes.
- Access Settings: Navigate to the “Summary” tab on the left side menu.
- Backup iPad: Click “Back Up Now” if a recent backup has not been made.
- Factory Reset: Click “Restore iPad.” Confirm by clicking “Restore” again in the pop-up window.
- Update and Restore: Allow iTunes to download necessary software updates and restore the device to factory settings.
- Setup Assistant: After the reset, the iPad will restart, presenting the Setup Assistant.
Steps for macOS Catalina and Later
- Open Finder: Use Finder instead of iTunes on macOS Catalina or later.
- Connect the iPad: Use a USB cable to connect the iPad to the Mac.
- Trust Computer: If prompted, click “Trust” on Finder and tap “Trust This Computer” on the iPad.
- Locate iPad: Select the iPad icon in the Finder sidebar.
- Backup iPad: Click “Back up all of the data on your iPad to this Mac” and select “Back Up Now” if needed.
- Factory Reset: Click “Restore iPad.” Confirm the action in the pop-up window.
- Update and Restore: Wait while Finder downloads the latest iPadOS and completes the restoration.
- Setup Assistant: After the process finishes, restart the iPad and complete the setup.
Follow these steps to factory reset the iPad efficiently via iTunes or Finder, ensuring a fresh start by erasing all content and settings from the device.
How to Soft Reset iPad
Performing a soft reset on an iPad can help resolve minor software glitches without erasing any data. It’s a simple process that reboots the device, clearing any temporary issues. Follow the steps below to execute a soft reset:
Locate the Power Button
- Locate the Power button on the top edge or the side of the iPad, depending on the model.
Locate the Home Button (if applicable)
- Identify the Home button at the bottom front of the device if the iPad has one. Modern iPad models without a Home button will use different steps.
Press and Hold the Necessary Buttons
For iPads with a Home button:
- Press and hold both the Power button and the Home button simultaneously.
For iPads without a Home button:
- Quickly press and release the Volume Up button.
- Quickly press and release the Volume Down button.
- Press and hold the Power button until the Apple logo appears.
Wait for the Apple Logo
- Continue holding the buttons until the Apple logo appears on the screen. This usually takes about 10 seconds.
Release the Buttons
- Once the Apple logo appears, release the Power button (and Home button if applicable). The iPad will go through the reboot process and start up again.
Verify the Reset
After the iPad restarts, confirm it’s operating as expected by checking for any previously encountered issues.
Note: A soft reset does not delete any personal data, settings, or apps; it simply refreshes the system.
By following these steps, users can effectively perform a soft reset on any iPad model, ensuring their device runs smoothly without losing any important information.
How to Hard Reset iPad
A hard reset, also known as a force restart, can help resolve various software issues on an iPad. Follow these steps to perform a hard reset based on the model:
iPad with Home Button
- Press and hold: Simultaneously press and hold the Top (or Side) button and the Home button.
- Wait for the Apple logo: Keep holding both buttons until the Apple logo appears.
- Release buttons: Once the Apple logo appears, release both buttons.
iPad without Home Button
- Press and release Volume Up: Quickly press and release the Volume Up button.
- Press and release Volume Down: Quickly press and release the Volume Down button.
- Press and hold the Top Button: Press and hold the Top button until the Apple logo appears.
- Release the Top Button: When the Apple logo is visible, release the Top button.
iPad Pro (2018 or later)
- Press and release Volume Up: Quickly press and release the Volume Up button.
- Press and release Volume Down: Quickly press and release the Volume Down button.
- Press and hold the Power Button: Press and hold the Power button until the Apple logo shows up.
- Release Power Button: Once the Apple logo is visible, release the Power button.
By following these instructions, users can perform a hard reset on their iPads, which can often resolve common software-related problems quickly and effectively.
How Do I Reset My iPad for a New Owner?

Resetting an iPad for a new owner involves a few simple steps to ensure all personal data is deleted and the device is ready for the next user. Follow these instructions carefully for a smooth process:
Back-Up the iPad:
- Before resetting the iPad, it’s crucial to back up any important data. This can be done through iCloud or iTunes.
To back up using iCloud:
- Connect the iPad to Wi-Fi.
- Go to Settings > [your name] > iCloud > iCloud Backup.
- Tap Back Up Now.
To back up using iTunes:
- Connect the iPad to a computer.
- Open iTunes and select the iPad.
- Click Back Up Now.
Sign Out of iCloud and the App Store:
- Signing out ensures the new owner won’t have access to the previous owner’s accounts and data.
- Go to Settings > [your name].
- Scroll down and tap Sign Out.
- Enter the Apple ID password and tap Turn Off.
Reset the Device:
- Now, it’s time to erase all content and settings.
- Go to Settings > General > Reset.
- Tap Erase All Content and Settings.
- Enter the passcode, if prompted.
- Tap Erase [Device Name] to confirm.
Remove the Device from the Apple ID Account:
Removing the iPad from the Apple ID account ensures it’s no longer linked to the previous owner.
- Visit the Apple ID website.
- Sign in with the Apple ID.
- Go to Devices.
- Select the iPad and click Remove from Account.
- Restore the iPad to Factory Settings:
- Once the reset is complete, the iPad should be restored to factory settings.
- The iPad will restart and display the setup screen.
- Follow the on-screen prompts to set up the device as new or leave it at the setup screen for the new owner.
By following these steps, one can ensure that the iPad is thoroughly reset and ready to be handed over to a new owner without any leftover personal data or settings.
How to Factory Reset iPad with Buttons

Factory resetting an iPad using the buttons involves a series of steps that may vary slightly depending on the iPad model. The following directions apply to both recent and older models.
Steps for iPad with Face ID
Connect to Computer:
- Ensure the iPad is connected to a computer via a USB cable.
- Make sure the latest version of iTunes (Windows) or Finder (Mac) is open and running.
Turn Off the iPad:
- Press and hold the Top button and either volume button until the power off slider appears.
- Drag the slider to turn off the iPad.
Enter Recovery Mode:
- Press and hold the Top button until the iPad starts to restart.
- Continue holding the Top button until the iPad goes into recovery mode.
Restore iPad:
- On the computer, a message should pop up indicating that your iPad is in recovery mode.
- Choose the “Restore” option and follow the prompts to factory reset your iPad.
Steps for iPad with Home Button
Connect to Computer:
- Attach your iPad to a computer using its USB cable.
- Open iTunes (Windows) or Finder (Mac), ensuring it is up-to-date.
Turn Off the iPad:
- Hold the Top (or Side) button until the power off slider appears.
- Slide to power off.
Enter Recovery Mode:
- Press and hold the Home button while connecting the iPad to the computer.
- Keep holding the Home button until you see the recovery mode screen.
Restore iPad:
- A message will appear on the computer indicating the iPad is in recovery mode.
- Click on “Restore” and follow the instructions to factory reset the iPad.
How to Factory Reset iPad Pro with Buttons

To factory reset an iPad Pro using buttons, follow the steps below:
Charge the iPad Pro:
- Ensure the iPad Pro has enough battery or is connected to a charger.
Back-Up Data:
- It’s essential to back up important data to avoid losing valuable information during the reset process.
Locate the Buttons:
- Identify the Volume Up, Volume Down, and Power buttons on the iPad Pro.
Initiate Reset Sequence:
- Press and quickly release the Volume Up button.
- Press and quickly release the Volume Down button.
- Press and hold the Power button until the Apple logo appears. This may take around 10-15 seconds.
Enter Recovery Mode:
- Continue holding the Power button until the recovery mode screen appears. It typically shows an iTunes icon with a lightning cable.
Connect to Computer:
- Use a USB cable to connect the iPad Pro to a computer with iTunes or Finder (on macOS Catalina and later).
Restore iPad via iTunes/Finder:
- Open iTunes/Finder on the computer.
- The software should detect the iPad Pro in recovery mode and prompt an option to “Restore” or “Update.” Select “Restore.”
- Confirm the action in the dialog box that appears, agreeing to erase all content and settings.
Wait for Process Completion:
- The restoration process should begin, taking a few minutes. Ensure a stable connection between the iPad Pro and the computer throughout this period.
Set Up iPad Pro:
- After resetting, the iPad Pro will reboot and display the initial setup screen. Follow the on-screen instructions to set it up as new or restore from a backup.
Note: The factory reset process will erase all data on the iPad Pro, restoring it to its original factory settings. Ensure data is backed up before proceeding.
How to Factory Reset iPad 2

To factory reset an iPad 2, follow the steps below carefully:
Prepare Your iPad:
- Ensure the device is fully charged or connected to a power source.
- Back up any important data using iCloud or iTunes.
Open Settings:
- Locate the “Settings” app and tap to open it.
Navigate to General Settings:
- In the Settings menu, scroll down and select “General.”
Reset Option:
- Scroll to the bottom of the General settings and tap on “Reset.”
Erase All Content and Settings:
- Select “Erase All Content and Settings.”
Note: This step will delete all data, settings, and apps on the device. It will restore the iPad to its original factory settings.
Confirm the Reset:
- A prompt will appear asking for confirmation. Tap “Erase” to proceed.
- The device may ask for the Apple ID password to disable “Find My iPad.”
Wait for the Process to Complete:
- The iPad will restart and begin the reset process. This may take several minutes.
- Once completed, the iPad will display the setup screen like it did when it was first purchased.
Set Up Your iPad:
- Follow the on-screen instructions to set up the iPad as a new device or restore from a backup.
By performing these steps, the iPad 2 will be reset to factory conditions, leaving the device free from prior data and configurations. Always ensure that necessary backups are made to avoid data loss.
How to Factory Reset iPad mini
To factory reset an iPad mini, follow these steps to erase all data and restore the device to its original settings:
Back-Up Data:
- Before starting the factory reset process, ensure that all important data is backed up. Users can use iCloud or iTunes to back up their data.
To back up using iCloud:
- Connect the iPad mini to a Wi-Fi network.
- Go to Settings > [user name] > iCloud > iCloud Backup.
- Tap Back Up Now.
To back up using iTunes:
- Connect the iPad mini to a computer with iTunes installed.
- Open iTunes and select the iPad mini.
- Click Back Up Now.
Prepare for Reset:
- Ensure the iPad mini has enough battery life or connect it to a power source.
- Make sure the device is connected to the internet, either via Wi-Fi or cellular data.
Perform the Factory Reset:
- Open the Settings app on the iPad mini.
- Go to General.
- Scroll down and select Reset.
- Tap Erase All Content and Settings.
- Enter the device passcode if prompted.
- Confirm the reset by tapping Erase, which will initiate the factory reset process.
Verify and Set Up Device:
- Wait for the iPad mini to complete the reset process. The device will restart and display the initial setup screen.
- Follow the on-screen instructions to set up the iPad mini as new or restore from the previously created backup.
Note: Users signed into a service like Find My iPad might need to enter their Apple ID and password to disable the Apple ID activation lock.
Factory Reset iPad Without Password
In some instances, users may need to perform a factory reset on their iPad without knowing the password. Whether dealing with a second-hand device or encountering an issue with the screen lock, the following steps walk through the process using iTunes and the recovery mode.
Steps to Factory Reset iPad Using iTunes:
Install iTunes:
- Ensure that the latest version of iTunes is installed on the computer. If it is not already installed, download it from the Apple website and complete the installation process.
Connect the iPad:
- Connect the iPad to the computer using a USB cable. Make sure the connection is stable.
Activate Recovery Mode:
For iPads with Face ID:
- Quickly press and release the Volume Up button.
- Quickly press and release the Volume Down button.
- Press and hold the Top button until the iPad enters recovery mode.
For iPads with a Home button:
- Press and hold the Top (or Side) button until the power off slider appears.
- Turn off the device.
- Hold the Home button while connecting the device to the computer.
- Keep holding the Home button until the recovery mode screen appears.
Restore the iPad:
- iTunes will detect an iPad in recovery mode and prompt the user with options.
- Choose “Restore” from the iTunes menu. This will download the necessary software and wipe the device, returning it to factory settings without requiring the password.
Setup the iPad:
- Once the restore process is complete, the iPad will restart.
- Proceed through the initial setup screens as if configuring a new device.
By following these steps, individuals can successfully reset their iPads to factory settings without needing the device’s password. This method is particularly beneficial when troubleshooting locked or unresponsive devices.
How to Factory Reset iPad without Apple ID
Always back up important data before proceeding with a factory reset.
Steps to Follow
Using Recovery Mode:
- Ensure the iPad is turned off.
- Connect the iPad to a computer using a USB cable.
- Open iTunes (for Windows or macOS Mojave and earlier) or Finder (for macOS Catalina and later).
Force restart the iPad:
For iPads with Face ID:
- Quickly press and release the volume up button.
- Quickly press and release the volume down button.
- Press and hold the top button until the “Connect to iTunes” screen appears.
For iPads with Home Button:
- Press and hold the Home button and the top (or side) button simultaneously until the “Connect to iTunes” screen appears.
- In iTunes or Finder, a message will prompt that the device is in Recovery Mode.
- Select “Restore” to reset the iPad to factory settings.
Using iTunes or Finder:
- Connect the iPad to the computer with a USB cable.
- Open iTunes/Finder.
- Locate the iPad icon.
- Click on the “Summary” tab (iTunes) or the iPad section in Finder.
- Click “Restore iPad.”
- Confirm the action to reset the iPad.
Using Third-Party Software:
- Download reliable third-party iOS system recovery tools (such as Tenorshare ReiBoot or Dr.Fone).
- Install and open the software on a computer.
- Connect the iPad to the computer.
- Follow the on-screen prompts to enter Recovery Mode.
- Select the option to factory reset the iPad.
Allow the software to reset the device and remove any associated Apple ID.
Important: Attempt factory resets only if necessary. Always verify recovery options before proceeding with third-party software.
How to Factory Reset iPad when Locked Out
When an iPad is locked out, it can still be factory reset using a computer with iTunes or Finder. This process involves connecting the iPad to a computer, putting it into recovery mode, and restoring it to its original factory settings. Follow these steps:
Prepare the Necessary Points:
- A computer (Windows or Mac).
- A USB or Lightning cable to connect the iPad to the computer.
- Make sure iTunes is installed on the computer (for Macs with macOS Mojave or earlier or Windows PC) or use Finder (for Macs with macOS Catalina or later).
Connect the iPad to the Computer:
- Utilize the cable to plug the iPad into the computer.
- Open iTunes on the computer (or Finder if using macOS Catalina or later).
Put the iPad into Recovery Mode:
For iPads with a Home button:
- Press and hold the Top (or Side) button until the power-off slider appears.
- Drag the slider to turn off the iPad.
- While holding the Home button, connect the iPad to the computer.
- Keep holding the Home button until the recovery mode screen appears.
For iPads without a Home button:
- Press and hold the Top button and one of the Volume buttons until the power-off slider appears.
- Drag the slider to turn off the iPad.
- While holding the Top button, connect the iPad to the computer.
- Keep holding the Top button until the recovery mode screen appears.
Restore the iPad:
- A dialog box in iTunes or Finder should appear, stating that there is a problem with the iPad that requires it to be updated or restored.
- Select the Restore option. This will download the latest iOS software and install it on the iPad.
- Follow the on-screen instructions in iTunes or Finder to complete the process.
Following these steps will help regain access to the iPad by restoring it to factory settings, and effectively removing all current settings, data, and passwords.
Conclusion:
Successfully factory resetting an iPad involves several careful steps to ensure data protection and device integrity. First, create a backup using iCloud or iTunes. Backups provide a safety net, allowing users to restore essential data after a reset.
To initiate the factory reset process, access the “Settings” app and navigate to “General” > “Reset” > “Erase All Content and Settings.” Confirm the action to start wiping the device. This will remove all personal data, settings, and installed apps, reverting the iPad to its original factory state.
After the reset, restore the backup to regain access to previously saved data. For iCloud backups, sign in with the same Apple ID and select the latest backup during setup. For iTunes, connect the iPad to a computer and select “Restore from Backup” in iTunes.
For enhanced security, consider the following practices:
- Regular Backups: Ensure regular backups to avoid potential data loss.
- Secure Data Deletion: When surrendering the iPad, verify the erasure of all personal information.
- System Updates: Keep the iPad updated with the latest iOS software for optimal performance and security.
- Strong Passwords: Use strong, unique passwords for Apple ID and other accounts to prevent unauthorized access.
For troubleshooting tips during the process, refer to Apple’s official support guides or consult an Apple Store. Issues such as forgotten passcodes or unresponsive systems often have tailored solutions available through Apple’s support channels.


1 thought on “How to Factory Reset Your iPad: All Models Guide”