
Table of Contents
Is your iPad running slow or lagging? Clearing the cache could be the quick fix you need! Over time, cached data from apps and websites can build up and cause your iPad to underperform. Knowing how to Clear the Cache on an iPad is a simple yet effective way to speed things up, giving your device a fresh start.
Regularly removing temporary files can free up storage space and enjoy faster, smoother app performance. Clearing the cache is a hassle-free way to optimize your iPad for a seamless experience.
How to Clear Safari Cache on an iPad?
Clearing the Safari cache can help improve performance and free up storage space on an iPad. Users may need to do this when experiencing issues with webpage loading or to maintain privacy. Here are the steps to clear the Safari cache on an iPad:

Open the Settings App:
- Locate and tap on the Settings app, which typically resembles a gray gear icon.
Navigate to Safari:
- Scroll down the Settings menu until finding Safari. Tap on it to access Safari settings.
Clear History and Website Data:
- Within the Safari settings, scroll down until the option labeled “Clear History and Website Data” is visible. Tap on it.
Confirm the Action:
- A confirmation prompt will appear, informing that clearing will remove history, cookies, and other browsing data. Tap on “Clear” to finalize the action.
Restart Safari:
- It’s a good practice to close Safari and reopen it to ensure the cache is cleared properly. To do this, double-click the Home button or swipe up from the screen to access the app switcher. Then, swipe up on the Safari preview to close it.
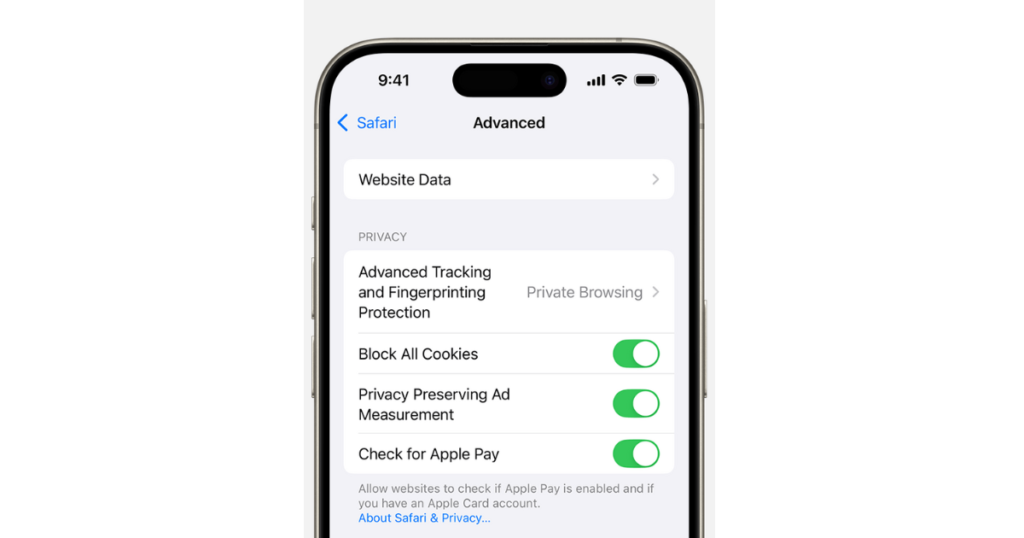
Private Browsing Mode:
- For users who frequently need to clear their cache, enabling Private Browsing Mode can be useful as it prevents Safari from saving browsing history, cookies, and other data. To enable it, open Safari, tap the tabs icon and select “Private” from the options.
Note: Clearing the cache will log out of websites and remove saved preferences. Users should ensure they have login details saved elsewhere if needed.
By following these steps, users can effectively clear the Safari cache on their iPad, resolving many common browsing issues and enhancing overall device performance. With a simple process in place, maintaining a clean and efficient browsing experience becomes straightforward.
How to Clear App Cache on an iPad?
Clearing the cache of individual apps on an iPad necessitates a few straightforward steps. Unfortunately, iOS does not offer a universal cache-clearing option for all apps. Instead, users need to manage the app data on a per-app basis. Here is how one can accomplish this:
Open the Settings App
- Locate and tap the grey gear icon titled “Settings” on the Home screen.
Navigate to General Settings
- Once in Settings, scroll down and tap on “General.”
Access iPad Storage
- Under General, find and select “iPad Storage.” This may take a moment to load, as it calculates the storage usage of all apps.
Review Storage Usage
- Browse through the list of installed apps to see the amount of storage they consume. Apps using significant storage may have accumulated cache that can be cleared.
Select a Specific App
- Tap on the app whose cache needs to be cleared. This will open the application’s specific storage settings.
Delete and Reinstall the App
- Unfortunately, as iOS lacks a direct option to clear the cache, tap “Delete App” to remove it. This action will prompt a deletion confirmation. Confirm to uninstall the app. This does not delete the data as iCloud backups can restore it.
- Next, head back to the App Store, locate the app, and reinstall it. This process clears the cache but retains essential user data if synced with iCloud.
Alternative: Offload App
- For iOS 11 and newer, another option is “Offload App.” Tapping this keeps the app’s documents and data but removes the app itself, thereby clearing its cache. Reinstall the app through the App Store afterward.
Here’s a simple infographic table format to explain how to clear the app cache on an iPad:
| Step | Description | Icon |
|---|---|---|
| 1. Open Settings | Tap the Settings icon on your iPad’s home screen. | 🛠️ |
| 2. Go to General | Scroll down and tap General in the Settings menu. | ⚙️ |
| 3. iPad Storage | Select iPad Storage to view the storage details of your device. | 🗂️ |
| 4. Select the App | Scroll through the list and tap the app you want to clear cache for. | 📱 |
| 5. Offload App | Tap Offload App to remove the app but keep its documents and data. Reinstall the app later if needed. | 🗑️ |
| 6. Reinstall the App | After offloading, reinstall the app from the App Store to clear the cache completely. | 🔄 |
Note: Regularly checking and managing app storage helps maintain optimal iPad performance and frees up space.
Clearing Cache for Different Browsers
On an iPad, users may use various browsers. Follow these steps for the most commonly used ones:
Microsoft Edge
- Open Edge: Launch the Microsoft Edge app.
- Open Menu: Tap the three dots at the bottom of the screen.
- Settings: Select Settings from the menu.
- Clear Browsing Data: Tap on Privacy and Security and then Clear Browsing Data.
- Choose Data to Clear: Select the specific types of data to clear.
- Clear Now: Tap Clear Now and confirm.
Opera
- Open Opera: Launch the Opera browser app.
- Menu: Tap on the red “O” at the bottom right.
- Settings: Tap on Settings from the menu.
- Clear Browsing Data: Choose Clear Browsing Data.
- Select Types of Data: Select the types of data you wish to clear.
- Clear Data: Tap Clear and confirm your action.
By following these steps, users can efficiently clear the cache on their iPads across different browsers, ensuring a smoother browsing experience.
How to Use Third-Party Apps to Clear the Cache
Third-party apps can offer a more streamlined way to clear the cache on an iPad. These apps are specifically designed to identify and delete unnecessary files that may be slowing down the device. Here is a guide on how to use these applications effectively.
Download and Install a Cache Clearing App
- Open the App Store on the iPad.
- Use the search bar to find cache-clearing apps such as “Cleaner Pro,” “Clean Doctor,” or “PhoneClean.”
- Tap the “Get” button next to the desired app and follow the on-screen instructions to install it.
Open the Cache Clearing App
- Locate the newly installed app on the home screen.
- Tap on the app icon to launch it.
Grant Necessary Permissions
- Upon opening the app for the first time, it may request access to various features of the iPad such as storage and files.
- Allow the necessary permissions to enable the app to function accurately.
Scan for Cache and Junk Files
- Most apps have a “Scan” or “Analyze” button on the main interface.
- Tap to initiate the scanning process. This will identify unused and residual files, as well as cached data.
Review Scan Results
- Once the scan is complete, the app will display a summary of the files detected.
- Typically, this includes cache files, junk files, and occasionally, large unused files.
Select Files to Delete
- Some apps might allow customization of what files to delete.
- Review the list and select the files that should be removed. If unsure, these apps often provide recommendations.
Clear Cache
- After selection, tap the “Clear” or “Delete” button.
- This will begin the process of removing the selected files from the device.
Restart the iPad (if necessary)
- Some apps recommend restarting the iPad to finalize cache clearing.
- Follow any prompts if provided by the app.
Using these third-party apps can considerably simplify the cache-clearing process, making the iPad run more efficiently. Always ensure to download apps from reputable developers to avoid potential security risks.
How to Clear the Cache on an iPad Pro?

Clearing the cache on an iPad Pro can help improve performance and free up storage space. Here’s a step-by-step guide:
Safari Browser Cache
Open Settings:
- Tap the Settings app on the Home screen.
Navigate to Safari:
- Scroll down and tap on Safari.
Clear History and Website Data:
- Scroll to the bottom and tap Clear History and Website Data.
- Confirm by tapping Clear in the popup dialog box.
App-Specific Cache
Check Storage:
- Go to Settings > General > iPad Storage.
Identify Apps:
- Look through the list to see the storage usage of apps.
Offload or Delete Apps:
- Select an app you want to clear the cache for.
- Tap Offload App to remove the app temporarily but keep its documents and data.
- Tap Delete App to remove the app and all its data.
- Reinstall the app from the App Store if you need it again.
Restart the Device
Shut Down:
- Press and hold the Power button until the slider appears.
- Slide to power off.
Restart:
- Wait a few seconds, then press and hold the Power button until the Apple logo appears.
How to Clear the Cache on an iPad Air?

Clearing the cache on an iPad Air can free up storage space and help the device run more smoothly. Here are the steps to clear the cache on an iPad Air:
Safari Browser Cache
- Open Settings: Tap on the “Settings” app on the home screen.
- Scroll and Select Safari: Scroll down until “Safari” appears and tap on it.
- Clear History and Website Data: Look for the option that says “Clear History and Website Data” and tap on it.
- Confirm Action: A pop-up will appear asking for confirmation. Tap on “Clear” to proceed.
App Cache
For most apps, clearing the cache requires either offloading or reinstalling the app:
- Open Settings: Tap on the “Settings” app on the home screen.
- Go to General: Scroll down and tap on “General.”
- Select iPad Storage: Tap on “iPad Storage” to view storage details and a list of installed apps.
- Choose App: Select the app whose cache you want to clear.
Offload or Delete App:
- Offload App: This will free up space but retain app data. Tap on “Offload App.”
- Delete App: This will remove the app and its data. Tap on “Delete App” and then reinstall from the App Store if needed.
Restart Device
Restarting the iPad Air can sometimes clear temporary caches and improve performance.
- Hold Down Power Button: Press and hold the power button until the “slide to power off” option appears.
- Slide to Power Off: Slide the bar to turn off the iPad.
- Turn On iPad Air: After it’s completely powered off, hold down the power button again to turn it back on.
How to Clear the Cache on an iPad Mini?

Clearing the cache on an iPad Mini can help enhance its performance and free up storage space. This guide will walk users through the steps necessary to clear the cache.
Clearing Safari Browser Cache
The Safari browser often stores lots of data. Clearing this data can improve browser performance.
- Open the Settings app.
- Scroll down and tap on Safari.
- Scroll and find the option labeled Clear History and Website Data.
- Tap on Clear History and Website Data.
Note: This will log users out of most websites but will not delete saved passwords.
- Confirm the action by tapping Clear.
Clearing App Cache
Some apps store data that can also be cleared. Unfortunately, iOS does not provide a system-wide cache-clearing option, but users can remove and reinstall apps to clear their cache.
- Open the Settings app.
- Tap on General.
- Select iPad Storage.
- Scroll to locate the app whose cache users wish to clear.
- Tap on the app.
- Users will see the app’s data as well as the option to Offload the App, which frees up storage used by the app but keeps its documents and data.
- Tap Delete App to remove it completely.
- Reinstall the app from the App Store.
By following these simple steps, users can effectively manage and clear the cache on their iPad Mini, ensuring smoother performance and additional storage space.
How to Clear the Cache on an iPad Chrome?
Clearing the cache on an iPad using the Chrome browser can help improve performance and resolve various browsing issues. Follow these steps to clear the cache:
Open Chrome Browser
- Launch the Chrome app from the iPad home screen.
Access Settings
- Tap the three vertical dots located in the upper-right corner of the browser. A dropdown menu will appear.
- Scroll down and select “Settings” from the dropdown menu.
Navigate to Privacy Settings
- In the Settings menu, scroll down to the “Privacy” section.
- Tap on “Privacy” to open Privacy and Security settings.
Clear Browsing Data
- Under Privacy settings, select “Clear Browsing Data.”
- A new window will appear showing different types of data that can be cleared.
Select Data to Clear
- Ensure “Cached Images and Files” is selected. You can also choose to clear other data such as “Browsing History” and “Cookies, Site Data” if needed.
- Use the blue checkmarks to select or deselect items.
Choose Time Range
- Tap on the “Time range” dropdown menu.
- Select the desired time range (e.g., “Last hour,” “24 hours,” “7 days,” “4 weeks,” or “All time”).
Clear Data
- After making selections, tap on the blue “Clear Browsing Data” button at the bottom-right of the screen.
- A confirmation message will appear, tap again on “Clear Browsing Data” to confirm and clear the cache.
Restart Browser
- For best results, close and restart the Chrome browser. This can be done by swiping up from the bottom of the screen and removing the Chrome app from the recent apps list.
Following these steps will clear the cache on the Chrome browser on an iPad, improving browsing speed and resolving many common issues.
How to Clear Cache on an iPad Firefox
Clearing the cache in Firefox on an iPad is essential for optimal performance. Follow these steps:
Open the Firefox App:
- Tap the Firefox icon on the iPad home screen.
Go to Menu:
- Tap the three horizontal lines (menu icon) at the bottom of the screen.
Access Settings:
- Select “Settings” from the menu options.
Navigate to Privacy:
- Scroll down and find the “Privacy” section under “Settings.”
Select Data Management:
- In the “Privacy” section, tap “Data Management.”
Choose Cache:
- You will see various options such as Cookies, Cache, Offline Website Data, etc. Toggle the switch next to “Cache.”
Clear Data:
- After selecting “Cache,” tap the “Clear Private Data” button at the bottom.
Confirmation:
- A confirmation prompt may appear; confirm by tapping “OK” or “Clear.”
Note: Clearing the cache will not remove saved passwords or bookmarks.
How to Clear Cache on an iPad Games?
Clearing the cache for specific iPad games can help improve performance and free up storage space. It may also resolve issues like lagging, crashing, or other in-game problems. Below are the steps to clear the cache on iPad games:
Using the Official In-App Options
Some games provide options within the app to clear cache or reset game data. Here’s how to find and use these options:
Open the Game:
- Launch the game for which the cache needs to be cleared.
Access Settings:
- Look for a settings icon, typically represented by a gear or three horizontal lines, usually found in the game’s main menu.
Locate Cache or Data Options:
- Navigate through the settings menu to find options like “Clear Cache,” “Delete Data,” or similar.
Clear Cache:
- Select the appropriate option to clear the cache. This might log the user out or reset some in-game settings.
Reinstalling the Game
If the above method isn’t available or does not solve the issue, reinstalling the game will effectively clear its cache:
Delete the Game:
- Tap and hold the game’s icon on the home screen until it starts to wiggle.
- Tap the ‘X’ button that appears on the top left corner of the icon.
- Confirm the deletion when prompted.
Reinstall from the App Store:
- Open the App Store.
- Search for the game and tap the download icon or ‘Get’ button.
- Install and open the game. Note that this will remove all saved data unless it is backed up online.
By following these steps, clearing the cache on iPad games can be done efficiently, ensuring a smoother gaming experience.
iPad Clear App Cache Without Deleting App
Clearing the cache of an iPad app can help improve its performance and free up storage space without losing essential data. Unfortunately, iOS does not provide a straightforward way to clear the cache for individual apps without deleting them. However, users can follow specific steps to achieve similar results:
Offloading Unused Apps
Offloading apps can free up storage without deleting the app’s data. When reinstalled, the app restores its previous state.
- Navigate to Settings.
- Tap on General.
- Select iPad Storage.
- Find the app in question and tap on it.
- Tap Offload App.
- This process removes the app itself but keeps its documents and data.
Clearing Safari Cache
For Safari users, clearing browser cache can enhance performance:
- Open Settings.
- Scroll down and tap Safari.
- Tap Clear History and Website Data.
- This removes all browsing history, cookies, and cached files.
Using Third-Party Apps
There are third-party apps that can assist in managing storage and clearing cache:
- CCleaner
- Cleaner Pro
- PhoneClean
Ensure to download apps from reputable sources and check user reviews.
App Settings
Some apps have built-in options to clear cache:
- Open the app.
- Go to the settings or preferences menu.
- Look for options such as Clear Cache or Storage.
Reinstalling the App
As a last resort, users can delete and reinstall the app:
- Press and hold the app icon on the Home screen.
- Select Remove App (iOS 14 and later) or Delete App.
- Go to the App Store and reinstall the app.
- “Reinstalling an app can significantly free up space and improve performance,” says tech expert Jane Doe.
By applying these methods, users can efficiently clear the app cache on their iPads without losing critical data.
What happens if I Clear the Cache on the iPad
Clearing cache on an iPad can influence the device and app performance in several ways. Understanding these changes can help users know when and why to clear cache.
Improved Device Performance
- Increased Storage Space: Clearing the cache removes temporary files, which can free up significant storage space. Users with limited storage may notice immediate improvements.
- Better App Performance: Cached files can become corrupted or outdated over time, causing apps to slow down or behave erratically. Clearing the cache can mitigate these issues, leading to smoother operation.
- System Responsiveness: The overall system may become more responsive and efficient due to reduced accumulated unnecessary files.
Potential Downsides
- Lost Preferences: Some apps store user preferences and settings in cache. Clearing the cache may reset these preferences, requiring users to reconfigure their settings.
- Slow Load Times: Initially, websites and apps may load slower as they need to re-download data. However, once re-cached, performance typically returns to normal.
- Temporary Inconveniences: Regularly used apps might need the user to log in again and re-establish sessions.
Enhanced Privacy
- Reduced Tracking: Clearing cache helps in removing tracking cookies and data stored by websites. This can enhance user privacy by minimizing the tracking of online activities.
- Cleared History: Saved information such as browsing history, search queries, and saved passwords may be wiped, adding an extra layer of privacy protection.
App-Specific Effects
- Browser Apps: For Safari and Chrome, clearing cache deletes cached web pages and site data. Consequently, previously visited websites will no longer auto-suggest in the search bar until re-visited.
- Streaming Apps: Applications like Netflix and YouTube store thumbnails and viewing preferences. Clearing these caches may initially cause slower load times for previously watched content.
- Social Media Apps: Social media applications like Instagram and Facebook may take time to reload images and videos initially, as they need to fetch fresh content from the servers.
When to Clear the Cache
- Lagging Performance: When the iPad or specific apps start lagging or freezing unexpectedly.
- Running Out of Storage: When users encounter storage limitations frequently.
- Privacy Concerns: Periodically clearing the cache can help maintain privacy by removing potential tracking data.
Clearing cache on an iPad is a useful maintenance activity that can optimize performance, free up storage, and enhance privacy but may come with temporary inconveniences.
Conclusion
Regularly clearing the cache on an iPad not only frees up storage space but also enhances the device’s overall performance. Users can take proactive steps to maintain their device’s health by understanding which aspects of the iPad store redundant data.
One of the primary areas to focus on is the browser cache. Safari, as the default web browser on the iPad, often retains a substantial amount of cached data, including history, cookies, and other site data.
Key Steps to Optimize Performance
Clear Browser Cache:
- Open Safari and go to Settings.
- Scroll down and tap on “Clear History and Website Data.”
- Confirm the action to remove all browsing data.
Manage App Cache:
- Identify apps that store large amounts of data.
- Go to Settings > General > iPad Storage.
- Select apps with significant storage consumption and use the “Offload App” option while keeping documents and data.
Reboot the Device:
- Regular rebooting can clear temporary files and refresh the system.
- Turn off the iPad, wait a few seconds, and turn it back on.
Update iOS:
- Ensure the iPad is running the latest version of iOS for optimal performance and security.
- Go to Settings > General > Software Update and install any available updates.
Reset Settings:
- If persistent issues continue, reset all settings.
- Go to Settings > General > Reset > Reset All Settings.
- This action will not delete personal data but may help clear unknown issues.
By following these steps, users can significantly enhance their iPad’s responsiveness and longevity. Keeping the device clutter-free allows for smoother operation and a better user experience.
Very interesting topic, thanks for posting.Blog monetyze