
Table of Contents
Introduction
Being able to take a screenshot on an iPad is one of the most basic skills users should know, as it can be beneficial in many situations for sharing content with other people or keeping records. Regardless of their reason, everyone will need to learn how to capture and manage screenshots at some stage during the life cycle of an iPad while they use it for educational purposes or tech support, making tutorials, or storing moments.
Different iPad models based on experience have Different designs and changed iOS versions means the instructions vary slightly when taking screenshots. But fundamental principles of it remain the same.
How to Take a Screenshot on an iPad home button?
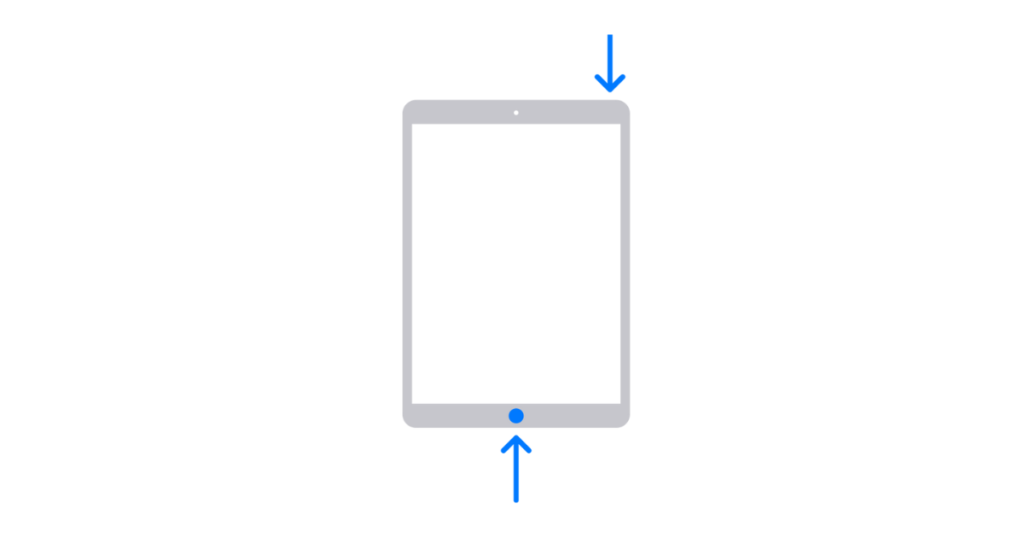
The process of taking a screenshot on an iPad that has the Home button is quite easy and fast. All users have to be concerned about the proper button presses and handling of the post-screenshots.
Locate the Buttons:
- Locate the Home button, a physical button on the face of the iPad.
- Locate the Top button (formerly known as the Sleep/Wake or Power button) on your device.
So, do the following at once:
- Hold the iPad securely.
- Top button + home Button
- Release both buttons quickly. If all goes well, the screen should flash white with a camera sound effect of some sort to signify that you took a screenshot.
View the Screenshot:
- When the screenshot is captured, you will see a little preview of it in the bottom left corner.
- Tap on the thumbnail to open up a screenshot. From here, users can save it when sharing the image directly.
- If the thumbnail is not clicked on, it will simply go away after a few seconds while registering an automatically taken screenshot in Photos.
Edit and Share:
- Launch Photos to see all saved screenshots.
- And a separate album is created for screenshots called Screenshots.
- Click on the screenshot to reveal it.
- Edit: Crop, Filter, or Light adjustments if any changes are to be made
- Changes completed, tap Done.
Share the Screenshot:
- Click on the Share icon (square box with an upward arrow)
- Select your sharing method (Messages, Mail, AirDrop…)
- Simply follow the on-screen prompts to then deliver that screenshot to a recipient or app.
Organizing Screenshots:
- The users might need to sort their screenshots for them to conveniently archive.
- Now in the Photos app, tap and hold on a screenshot to choose multiple images.
- Select Add to Album, and make a new album or add to an existing one.
- This way you can easily find important screenshots and your photo library remains a little less cluttered.
The following process helps users to capture, see, and share screenshots on a Home button iPad with ease. Knowing this feature makes the overall experience even better.
How to Take a Screenshot on an iPad without the button?
For those with an iPad model without a Home button, or that simply do not want to use buttons to snap screenshots on the device, there are other options as well for screen capture shots.
Using AssistiveTouch
Assistive Touch is a great way to take screenshots without using physical buttons. Featuring an on-screen floating button for executing actions
Activate AssistiveTouch:
- Navigate to the Settings app on your iPad.
- Go to Accessibility.
- Turn on Touch, then tap AssistiveTouch.
- Back on the Accessibility page, tap to switch off AssistiveTouch. The floating button will be displayed on the screen.
Set Up Screenshot Action:
- Under AssistiveTouch Settings, tap on Customize Top Level Menu.
- To add an icon just click on an existing or the plus.
- Choose a Screenshot from the action options list.
- Tap Done when prompted to save the settings.
Screenshot from the AssistiveTouch
- You will find a floating AssistiveTouch button on the screen.
- Click the Screenshot icon from this menu option.
- Your screen will flashWhite and a thumbnail of the screenshot should briefly appear in the lower-left corner.
Using Siri
Activate Siri:
- Press and hold the Home button, or Side button, or just say “Hey Siri” to invoke Sir.
Give the Command:
- Just say, ” Screenshot.
Screenshot Taken:
- Siri will take the screenshot, and it has a thumbnail of the image at its left bottom side.
Third-Party Apps
A lot of third-party apps are available to take screenshots without the use of physical buttons. A few suggested apps are;
Lightshot:
- The app is available to download from the App Store.
- Simply follow the instructions inside the app on how to take a screenshot.
Screenshot Pro:
- Available on the App Store.
- Delivers extra options to Reverand to edit screenshots
This exploration will allow users to expand the functionality of their iPad, without needing to touch physical buttons and in turn improve overall user experience.
How to Take a Screenshot on an iPad Pro?
It is easy to take a screenshot on iPad Pro. Steps To Record Any Content on Your Screen
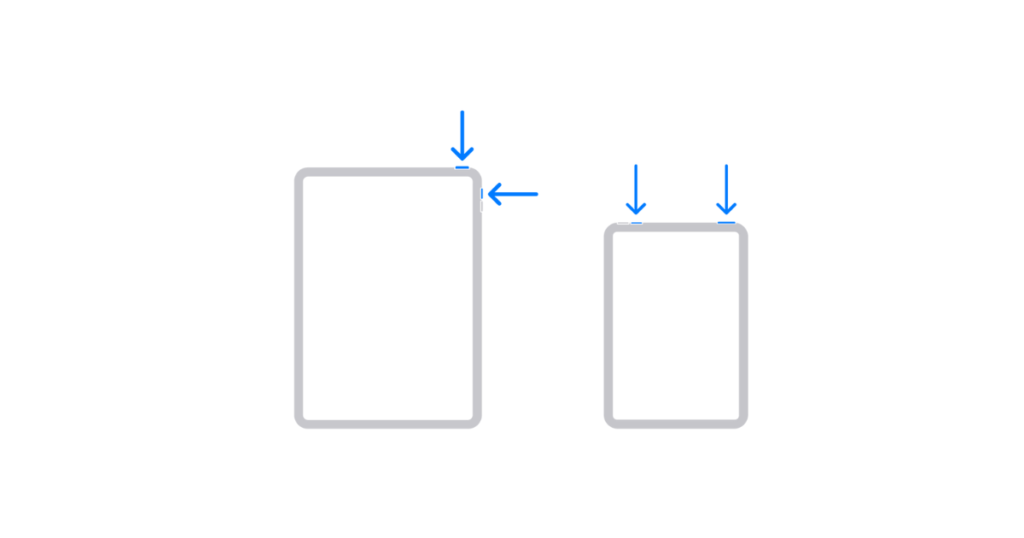
Find the Buttons: The Volume Up button is located along the side of your iPhone, while what was once known as either Sleep/Wake or Power buttons have been moved to this area on top.
Locate and press these buttons at the same time:
- Hold down the Top button.
- Press the Volume Up button fast.
- Now, let go of the buttons directly.
Confirm the Screenshot:
- A tiny thumbnail of your screenshot will appear in the lower left corner.
- Choose the thumbnail and you will see your screenshot in the markup editor or swipe left on the thumbnail to dismiss it saving automatically into your Photos app.
Alternatively, if configured:
Use AssistiveTouch:
- Open the Settings app.
- Settings > Accessibility> Touch> AssistiveTouch
- Toggle AssistiveTouch to ON.
- Add a Screenshot option to the menu
- Next, open the AssistiveTouch menu and hit Screenshot to take a shot of your screen.
The screenshots are saved into the Photos app once they have been captured. Here are the steps to locate and share them :
Open the Photos App: Find and Tap the Icon on the Home Screen
Navigate to Screenshots:
- Go to the Albums tab.
- Tap on the Screenshots album.
Share the Screenshot:
- Choose a screenshot of your choice to share.
- Click on the share icon at the bottom left.
- You can also tap on Share and choose your method of sharing – AirDrop, Message, Mail, etc.
You can access the same user guide for more help from within iPadOS, through Apple’s support website, or use a built-in iPad user guide in the Books app. Learning these simple and easy ways makes it easier to take, and explore screenshots.
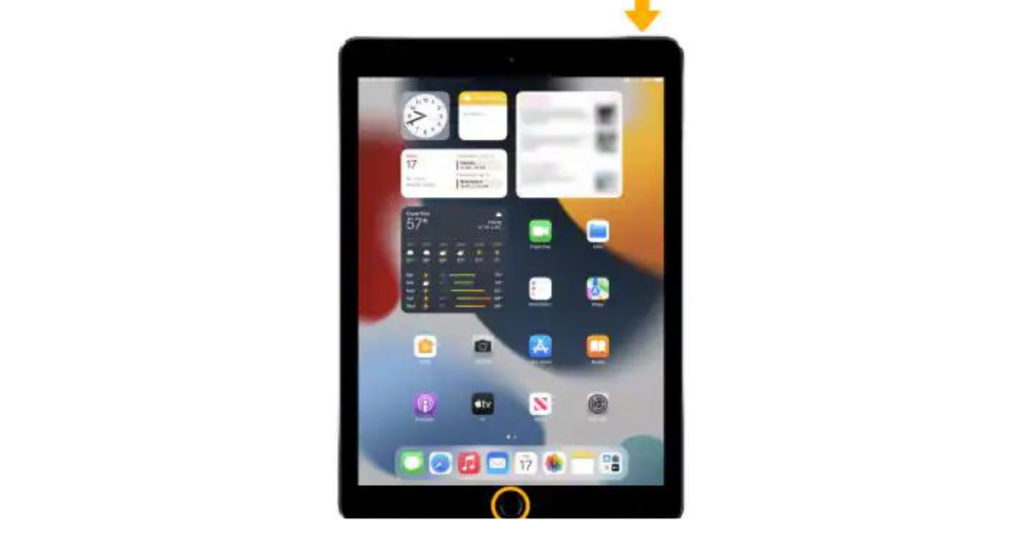
How to Take a Screenshot on an iPad 10?

You might want to take a screenshot anyway for things like saving information, sharing visuals, or troubleshooting on the iPad 10. How to take screenshots on iPad 10 using physical buttons & gestures Here’s how to do it:
Using Physical Buttons
Locate the necessary buttons:
- Top button: Located on the top of the device
- Volume Up: Right Side of iPad
Press simultaneously:
- Simultaneously press the Top Button and either the Volume Up or Down button.
- Once you hold both buttons let them go.
Check the screen flash:
- Upon successful completion, the screen flashes white for a moment.
- In the bottom left corner, you will see a thumbnail preview of your screenshot.
Edit or save:
- Click on the thumbnail to be able to edit or mark up if necessary.
- Once doing that, go ahead and swipe left on the thumbnail to save it directly into your Photos app.
Using AssistiveTouch
For those who do not wish to use physical buttons, assistive touch is an accessibility feature that can be enabled.
Activate AssistiveTouch:
- Go into Settings -> General, then tap on Accessibility, and next scroll down to select AssistiveTouch.
- Turn on AssistiveTouch
Adjust the AssistiveTouch menu:
- Click on Customize Top Level Menu.
- Include a Screenshot as a choice if it is missing.
Take the screenshot:
- Tap the floating button on the screen to bring up AssistiveTouch.
- Click on Screenshot from the menu.
How to Take a Screenshot on an iPad 9?
How to Take a Screenshot on the iPad 9 There are a couple of different ways to do this: There is the traditional way involving the use of the hardware buttons, then there are the icon controls, and among them is the AssistiveTouch.
Physical buttons
Locate the Buttons:
- Top Button – Located at the top right corner
- Volume Up Button (Right Side)
Hold down the Following Two buttons at a Time:
- Press and then quickly release the Top button and Volume Up.
- The screen will briefly turn white, signaling that a screenshot has been captured.
Preview and Edit:
- A thumbnail will be shown in the bottom left corner Edit or add your annotation by clicking on it.
- If left alone it will automatically save this screenshot to your Photos.
AssistiveTouch
Enable AssistiveTouch:
- Open the Settings app.
- Show Accessibility > Touch > AssistiveTouch (enabled or blank)
Configure Screenshot Action:
- On the AssistiveTouch settings page, scroll down a little and find Customize Top Level Menu.
- Click on the Custom icon and then click Screenshot from the drop-down menu of choices.
Take a Screenshot:
- Click on the AssistiveTouch menu which will appear on your screen.
- Choose the screenshot to take a photo of the screen.
How to Take a Screenshot on an iPad Mini?

Grabbing a screenshot from an iPad Mini is also easy as can be. Captions: The Home and Side buttons on their own or with the AssistiveTouch feature in iOS. Here’s how to do it:
Using the Physical Buttons
- Taking a screenshot with the hardware buttons
- Find the Buttons: point out which one is your power button and also, the home Button. For newer models without a home button, press the top button and volume up.
Press Simultaneously:
- In the case of iPad Mini with the Home Button: press the top button and home button together
- On an iPad Mini without a Home button: Simultaneously press the top button and volume up or down.
- During this instant burst-swap phase, do not keep pressing your buttons to release them quickly. Just a single firm push should work.
- Check the Screen Flash: The screen flashes in white, And a thumbnail of the screenshot appears on down left side
- Edit or Save: Tap on the thumbnail to edit and save. The text file will automatically be saved to the Photos app if left alone.
Using AssistiveTouch
If you are more challenged with button combinations, the user can use AssistiveTouch.
Enable AssistiveTouch:
- Open the Settings app.
- Go to Accessibility > Touch, then select AssistiveTouch.
- Toggle AssistiveTouch to On.
Customize Menu (Optional):
- Click on Customize Top Level Menu to bring up the customization menu onCreateOptionsMenu – add a Screenshot button
- Press the plus button and then choose Screenshot in the “Choose actions” list.
Take Screenshot:
- Click on the AssistiveTouch icon.
- Then choose the option to take a screenshot by following Device -> More on the toolbar and then Screenshot.
- Notification: Like the physical method, your screen will briefly flash and a thumbnail may pop up.
How to Take a Screenshot on an iPad Mini 6?

It is effortless and intuitive to take screenshots on the iPad mini 6. This model has no Home button, so the process is a little different from iPads of old. Here is a breakdown of our simple screenshots guide step-by-step:
Find The Power And Volume Up Buttons
- Look for the Power button, which is located on top of the right-hand side of your iPad Mini 6.
- Find the Volume Up button on the rightmost of your device.
Prepare the Screen:
- On the screen you would like to grab (take a screenshot of) This may be an app, a website, or any other screen on your iPad mini 6.
Take the Screenshot:
- Hold the power button and at the same time press Volume Up.
- Release both buttons quickly. If executed as it should be, you will hear a shutter sound and the screen will flicker or flash briefly: that is your cue to know when a screenshot has been taken.
Access the Screenshot:
- In the above screen, just a thumbnail image from your screenshot will be shown in the lower-left corner of the interface.
- Tap on the thumbnail to open it. Here, users can also crop the screenshot or annotate it.
Save or Share:
- Once you have done your editing, click on “Done” in the top left to save that screenshot into the Photos app.
- Or, you can tap on the share icon at the top right if you want to email or message your screenshot through other apps.
How to Take a Screenshot on an iPad Air?

Want to take a screenshot on your iPad Air? In this quick post, I highlight how you can easily take screenshots: Follow These Steps to Easy Capture ScreenShot
Using Physical Buttons
- Find the Buttons: Locate The iPad Air Top Button (Power button) and Side Volume up-Button
- Simultaneous Press: Hold down the top button and volume up fromesisorts
- Quick Release: Quick release of both fingers.
- Screenshot capture confirmation: Shows a brief thumbnail of the screenshot towards the bottom left side.
Editing the Screenshot
- Touch the Thumbnail: To edit a screenshot directly tap on the thumbnail before it leaves.
- Edit Interface: Here you have several basic editing tools to crop, draw arrows or text, and stuff
- Save or Share: Tap Done after you have made your edits, which will save the edited version to Photos or Files, alternatively take advantage of the share button and send it off.
Using AssistiveTouch
- To do this, go to Settings > Accessibility > Touch and turn on AssistiveTouch.
- Click “Customize Top Level Menu” and add it to the top-level menu if it isn’t already.
- Recording the display: Open the AssistiveTouch menu, go to “Custom”, and click on “Screen Recording” first.
These are the methods that allow users to rapidly and effectively take care of screenshots on their iPad Air. You might find this the fastest, whilst AssistiveTouch offers a similar service for people who want to go on using touch controls.
How to Take a Screenshot on an iPad Air 5?

It is relatively simple to take a screenshot on an iPad Air 5, you have two methods: using a button combination and another option for people who do not like to use the button.
Using Hardware Buttons
Locate the Buttons:
- Now locate the Top button on the top side of your device (previously known as the Sleep/Wake button)
- The Volume Up button is on the right side of the device.
Hold these buttons together:
- Press in and then quickly release the Volume Up button, followed by pressing in and doing a quick release of the Top button.
- The screen will turn white, telling you that the screenshot has been successfully captured.
View the Screenshot:
- Then a thumbnail of the screenshot will pop up in the bottom left corner of the screen.
- Touch the thumbnail to directly view and edit your captured screenshot, or swipe it away to ignore it.
Using AssistiveTouch
Catering to us lazy folks who might find using the hardware buttons a bit too difficult, there is an AssistiveTouch option.
Activate AssistiveTouch:
- Go to the Settings app.
- Select Accessibility.
- Tap on Touch.
- Toggle on AssistiveTouch.
Customize Assistive Touch
- Tap Customize Top Level Menu.
- Screenshot can be one option, click on the “+” icon and select Screenshot.
Screenshot with Assistive Touch
- Quickly tap the AssistiveTouch floating button on the screen.
- Scroll down to take a Screenshot.
- The display will flash and a screenshot is captured.
How to Take a Screenshot on an iPad Air 2?

The process of taking a screenshot on your iPad Air 2 is easy and simple. Quick and painless screen capture is as follows:
Locate the necessary buttons:
- You can find the Sleep/Wake button at its top edge.
- The Home button is in the middle of the bottom front screen.
Position your fingers:
- Hold the device securely.
- Hold down the Sleep/Wake button and at the same time, position one finger on top of it while you use your second-hand rest another finger directly above that if you touch the Home Button.
Press the buttons together
- Though, some people have their iPhone home screen sound not working issue is fixed by resetting all settings and pressing the synchronically hold-on sleep/wake button along with a Home key.
- Simply press OK to save the screen. The buttons do not need to be held down for more than a moment.
Release the buttons:
- Release the two buttons once you press them.
- The screenshot is then taken, accompanied by the shutter sound (if your device sounds are enabled).
View the screenshot:
- The screenshot will briefly appear in a thumbnail at the bottom-left of your screen.
- Review and Edit Screenshot Simply tap on the thumbnail, to review & open your recent screenshot for editing directly from this screen.
Thus, with these methods, users can easily take screenshots and handle them on iPad Air 2.
Conclusion
Taking a screenshot on an iPad is something that you will use quite often, and once mastered it can be performed simply as well. In just a few seconds, you can snap important information as long as you’re following the right processes and tips.
Familiarize with Shortcuts:
- For more recent iPad models: The top button and the volume buttons have to be pressed at once.
- For older models with a Home button: Press the top and home buttons at the same time.
- Apple Pencil owners: Swipe up from the lower corner of the screen.
Utilize Markup Tools:
- Tap on the thumbnail that briefly appears in the lower left-hand corner after you have taken a screenshot.
- Do the markup to annotate your screenshot with pens, highlighters shapes, text
- After you have your screenshot edited & ready to go select Done and then choose whether you want to save it To Photos or Files.
Practice Editing and Sharing:
- Open the Photos app and navigate to the “Screenshots” album.
- Edit, Crop, Apply filters, and adjust the Brightness & Contrast of any screenshot.
- Send screenshots by messaging apps, social media, or email from the Photos app
Organize Screenshots:
- Now, organize screenshots into albums in Photos so you can easily find references.
Now you may organize all the screenshots into different folders via the Files app, so it would save you time on finding them afterwards.
Leverage Third-Party Apps:
- Apps like Skitch, Snap Markup, and Annotable let you do a lot more with annotations as well.
- They usually come with a more extensive set of tools and capabilities than the default Markup features.
Regular Cleanup:
- Regularly go through and delete the screenshots that you no longer need.
- Connect iCloud or another cloud service to backup data, and use it while on the go
Once these last few tips are implemented, users can improve how they take screenshots on the iPad. With this, you can think about the effectiveness of correctness and improve to convey information efficiently. The features and tools it provides will make the process easier and thereby efficient.
I like this weblog very much, Its a real nice billet to read and obtain info.Leadership